Support our educational content for free when you buy through links on our site. Learn more
Have you ever gazed at a bonsai and wondered how those ancient, weathered scars on the trunk came to be? That’s the magic of the Shari bonsai technique—a bold, artistic method that reveals the “bones” of your tree, telling a story of survival, resilience, and timeless beauty. At Bonsai Garden™, we’ve spent decades perfecting this technique, transforming ordinary bonsai into breathtaking masterpieces that seem to have weathered centuries of storms.
In this article, we’ll take you step-by-step through everything you need to know about Shari—from the history behind this ancient art to the best tree species for deadwood, the essential tools you’ll need, and the critical aftercare that keeps your Shari looking ghostly white and rot-free for years. Plus, we’ll share insider tips on avoiding fatal mistakes that could turn your bonsai into firewood. Ready to uncover the “bones” beneath the bark? Let’s dive in!
Key Takeaways
- Shari is the art of stripping bark to expose deadwood, adding drama and age to your bonsai.
- Best suited for hardy evergreens like Shimpaku Juniper and Japanese Black Pine.
- Requires specialized tools like Jin pliers and lime sulfur for preservation.
- Timing and precision are critical—never girdle the tree or cut vital sap lines.
- Proper aftercare with lime sulfur ensures your Shari remains white and rot-free.
Curious about which tools will make your Shari flawless? Scroll down for our expert-rated tool recommendations and where to get them!
Table of Contents
- ⚡️ Quick Tips and Facts
- 📜 The Ancient Soul of Deadwood: History and Origins of Shari
- 🎨 The Art of the Scar: Rationale and Aesthetic Application of Shari
- 🌲 Top 7 Tree Species Perfect for Shari Techniques
- 🛠️ The Surgeon’s Kit: Essential Tools for Carving Deadwood
- 🔪 Masterclass: 10 Steps to Creating a Breathtaking Shari
- 🧪 Preserving the Ghost: Aftercare and Lime Sulfur Application
- ⚠️ 5 Fatal Mistakes to Avoid When Peeling Bark
- 🌿 Jin vs. Shari vs. Sabamiki: Knowing Your Deadwood Styles
- 🏁 Conclusion
- 🔗 Recommended Links
- ❓ FAQ: Your Burning Shari Questions Answered
- 📚 Reference Links
⚡️ Quick Tips and Facts
Before we start peeling back the layers of your tree’s “skin,” let’s look at the fast facts of the Shari bonsai technique.
| Feature | Detail |
|---|---|
| Definition | Stripping bark from the trunk to simulate natural weathering and age. |
| Best Time | Late spring to early summer (when sap is flowing freely). |
| Key Tool | Jin Pliers and sharp carving chisels. |
| Must-Have Chemical | Lime Sulfur (for whitening and preservation). |
| Risk Level | High (if you cut off the “life line” or sap flow). |
| Visual Goal | To create a “bone-white” contrast against dark bark. |
Quick Pro-Tip: Never circle the entire trunk with a Shari. If you break the vascular connection between the roots and the foliage, you don’t have a bonsai anymore—you have firewood! ❌
📜 The Ancient Soul of Deadwood: History and Origins of Shari

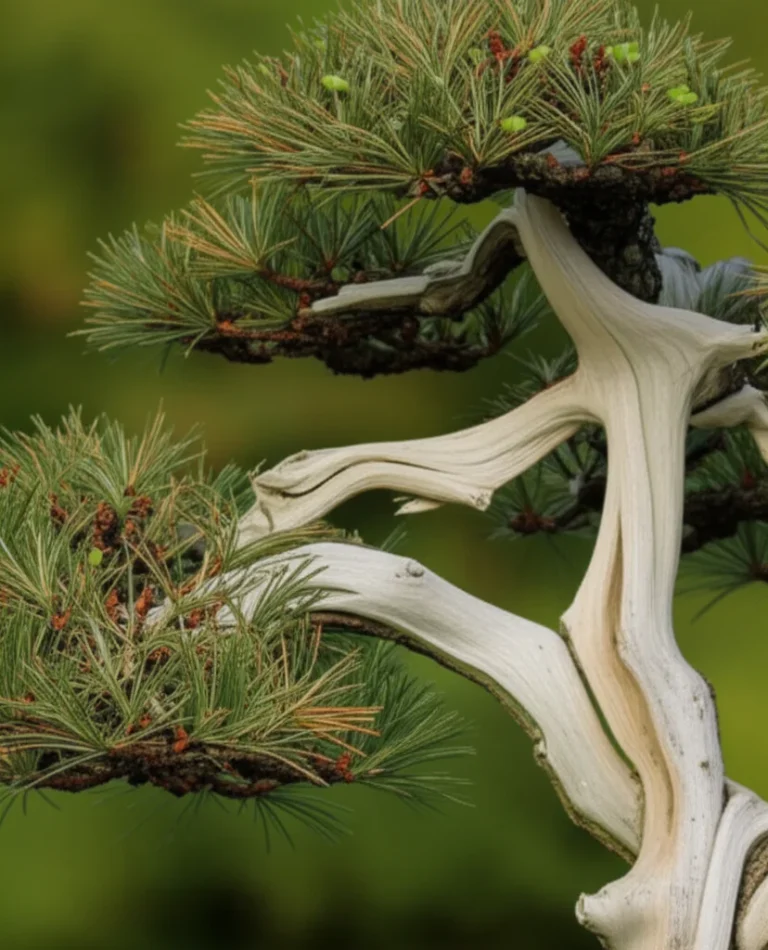
Have you ever looked at a gnarled old Juniper clinging to a cliffside in the Sierras or the Japanese Alps? We certainly have, and let us tell you, nature is the ultimate sculptor. The Shari bonsai technique (舎利) isn’t just a fancy way to mutilate a tree; it’s a tribute to survival.
Historically, Japanese masters observed trees that had survived lightning strikes, brutal winters, and rockslides. The bark would be ripped away, leaving the inner wood to bleach in the sun. In the world of Bonsai, Shari represents the “bones” of the tree. The word itself actually translates to “remains” or “Buddha’s relics,” hinting at the spiritual depth of this practice. We use it to tell a story of a tree that has fought the elements and won.
🎨 The Art of the Scar: Rationale and Aesthetic Application of Shari
Why do we do it? Is it just because we like playing with sharp objects? (Okay, maybe a little). But the real reason is Wabi-sabi—the beauty of imperfection and the passage of time.
Shari adds an immediate sense of “Mochikomi” (the feeling of age). By exposing the deadwood on the trunk, you create a dramatic color contrast. Imagine the deep, flaky reddish-brown bark of a Shimpaku Juniper juxtaposed against a stark, swirling white Shari. It’s breathtaking!
Key Rationale Points:
- Tapering: You can use Shari to visually thin a trunk that is too thick or lacks movement.
- Drama: It creates a focal point that draws the eye upward.
- Balance: It balances the “heaviness” of dense foliage with “light” skeletal structures.
🌲 Top 7 Tree Species Perfect for Shari Techniques
Not every tree wants to go “streaking.” Deciduous trees (like Maples) tend to rot if you expose their heartwood. We recommend sticking to the “tough guys” of the bonsai world.
- Shimpaku Juniper (Juniperus chinensis): The undisputed king of Shari. Its wood is rot-resistant and twists beautifully.
- California Juniper: Known for massive, natural deadwood.
- Japanese Black Pine (Pinus thunbergii): Requires more care, but Shari on an old Pine looks incredibly rugged.
- Yew (Taxus): Has very hard wood that takes carving exceptionally well.
- Buttonwood: A tropical favorite that naturally develops “driftwood” styles.
- Ponderosa Pine: Often found with natural Shari in the wild.
- Bald Cypress: Great for “Sabamiki” (hollow trunk) styles which are a cousin to Shari.
🛠️ The Surgeon’s Kit: Essential Tools for Carving Deadwood
You wouldn’t perform surgery with a butter knife, right? To get that professional look, we use specific tools that allow for precision and natural-looking textures.
- Jin Pliers: Essential for grabbing and tearing bark strips. We recommend the Kaneshin Jin Pliers for their legendary Japanese durability.
- Graving Chisels: For carving channels and detail.
- Dremel or Rotary Tool: For those who want to speed up the process. Use specialized bits like the Terrier or Weasel bits.
- Wire Brushes: To clean the wood and reveal the grain.
- Marking Pen: To map out your “life lines” before you cut.
🔪 Masterclass: 10 Steps to Creating a Breathtaking Shari
Ready to dive in? We’ve ruined enough practice trees over the last 20 years to know exactly how you should approach this. Follow these steps carefully!
- Identify the Life Line: This is the most important step. Find the veins of bark that connect the roots to the living branches. Do not cut these.
- Visualize the Flow: Use a chalk or a marker to draw the Shari. It should follow the natural twist of the trunk.
- Outline the Cut: Use a sharp scalpel or a Ryuga Bonsai Knife to cut through the bark down to the wood.
- The First Peel: Use your Jin pliers to grab a corner of the bark and pull. If it’s spring, it should peel like a banana! 🍌
- Refine the Edges: Ensure the transition between live bark and deadwood is clean.
- Carve the Wood: Use your chisels to create “grain” and “cracks.” Nature doesn’t make smooth surfaces; it makes ridges.
- Clean the Surface: Use a brass wire brush to remove any fuzzy cambium remnants.
- Weathering: Let the wood dry out for a few days. It will naturally start to crack slightly.
- Apply Lime Sulfur: This is the magic juice. It kills fungus and bleaches the wood white.
- Annual Maintenance: Re-apply lime sulfur once a year to keep that “ghostly” glow.
🧪 Preserving the Ghost: Aftercare and Lime Sulfur Application
Once you’ve carved your masterpiece, you need to protect it. Raw wood will rot if left to the elements.
How to apply Lime Sulfur:
- Wet the wood first: This helps the sulfur soak in evenly and prevents blotching.
- Protect the soil: Put a plastic sheet over the soil. Lime sulfur in the roots is a big ❌.
- Use a dedicated brush: It smells like rotten eggs (seriously, it’s pungent!), so don’t use your favorite paintbrush.
- Add a drop of ink: Some masters add a tiny drop of black India ink to the sulfur to create a more “weathered grey” look rather than “stark white.”
We recommend the Starbond Lime Sulfur for consistent results.
⚠️ 5 Fatal Mistakes to Avoid When Peeling Bark
We’ve seen it all at Bonsai Garden™. Avoid these pitfalls to keep your tree in the “living” category:
- Girdling the Tree: Cutting a ring all the way around. This is a death sentence.
- Carving Too Deep: If you cut through the heartwood of a young tree, you might compromise its structural integrity.
- Ignoring the Sap Flow: Always ensure every branch has a “highway” of bark leading to the roots.
- Working on Weak Trees: Never perform Shari on a tree that was recently repotted or is showing signs of stress. ✅ Only work on healthy trees.
- Using Dirty Tools: This can introduce pathogens. Clean your tools with isopropyl alcohol between trees.
🌿 Jin vs. Shari vs. Sabamiki: Knowing Your Deadwood Styles
It’s easy to get these confused, but they are distinct techniques:
- Jin (神): A dead branch. It looks like a spike or a bleached twig sticking out.
- Shari (舎利): Deadwood on the trunk.
- Sabamiki: A hollowed-out trunk, looking like the tree was split by lightning or rotted out from the inside.
- Uro: Small, natural-looking hollows or “knotholes.”
🏁 Conclusion

Creating a Shari is like writing a biography for your tree. It tells the story of the storms it has weathered and the years it has endured. It’s a bold move that requires a steady hand and a keen eye for aesthetics. Remember, you can always take more bark off later, but you can’t put it back on! Start small, respect the life lines, and watch your bonsai transform from a nursery plant into a masterpiece.
So, are you ready to grab those pliers and uncover the “bones” of your favorite Juniper? We think you are. Just remember: Measure twice, cut once, and keep that lime sulfur away from your nose! 👃❌
🔗 Recommended Links
- Bonsai Empire: Deadwood Techniques
- Kaneshin Japan – Professional Grade Tools
- Mirai Live (Ryan Neil’s Masterclasses)
❓ FAQ: Your Burning Shari Questions Answered

Q: Does Shari hurt the tree? A: If done correctly on a healthy tree, no. The tree simply “seals” the edges of the living bark (callus) and continues to grow through the remaining veins.
Q: Can I do Shari on a Maple? A: We don’t recommend it. Deciduous wood is soft and prone to rot. If you must, you’ll need to use a wood hardener like PC-Petrifier.
Q: How long does it take for the wood to turn white? A: With Lime Sulfur, it turns white almost instantly as it dries. Naturally, it can take years of sun bleaching.
Q: When is the best time of year for Shari? A: Late spring. This is when the cambium is active, making the bark much easier to “slip” or peel.
📚 Reference Links
- Yoshimura, Y. (1957). The Art of Bonsai. Link to Archive
- Naka, John. (1982). Bonsai Techniques I & II. The “Bibles” of Bonsai.
- International Bonsai Magazine. Official Site
⚡️ Quick Tips and Facts
Before we start peeling back the layers of your tree’s “skin,” let’s look at the fast facts of the Shari bonsai technique. At Bonsai Garden™, we believe that understanding the “why” is just as important as the “how.”
| Feature | Detail |
|---|---|
| Definition | Stripping bark from the trunk to simulate natural weathering and age. |
| Best Time | Late spring to early summer (when sap is flowing freely). |
| Key Tool | Jin Pliers and sharp carving chisels. |
| Must-Have Chemical | Lime Sulfur (for whitening and preservation). |
| Risk Level | High (if you cut off the “life line” or sap flow). |
| Visual Goal | To create a “bone-white” contrast against dark bark. |
Quick Pro-Tip: Never circle the entire trunk with a Shari. If you break the vascular connection between the roots and the foliage, you don’t have a bonsai anymore—you have firewood! ❌ Check out our Bonsai Care Basics for more on keeping your trees alive while styling.
📜 The Ancient Soul of Deadwood: History and Origins of Shari

Have you ever looked at a gnarled old Juniper clinging to a cliffside in the Sierras or the Japanese Alps? We certainly have, and let us tell you, nature is the ultimate sculptor. The Shari bonsai technique (舎利) isn’t just a fancy way to mutilate a tree; it’s a tribute to survival.
Historically, Japanese masters observed trees that had survived lightning strikes, brutal winters, and rockslides. As noted by Wikipedia, deadwood reflects natural aging with a focus on a weathered appearance. In the world of Bonsai, Shari represents the “bones” of the tree. The word itself actually translates to “remains” or “Buddha’s relics,” hinting at the spiritual depth of this practice. We use it to tell a story of a tree that has fought the elements and won. For those just starting their journey, our Bonsai for Beginners guide offers a great entry point into these traditional concepts.
🎨 The Art of the Scar: Rationale and Aesthetic Application of Shari
Why do we do it? Is it just because we like playing with sharp objects? (Okay, maybe a little). But the real reason is Wabi-sabi—the beauty of imperfection and the passage of time. According to Wazakura Japan, “Shari and Jin are about capturing the essence of nature’s scars, telling a story of resilience and age.”
Shari adds an immediate sense of “Mochikomi” (the feeling of age). By exposing the deadwood on the trunk, you create a dramatic color contrast. Imagine the deep, flaky reddish-brown bark of a Shimpaku Juniper juxtaposed against a stark, swirling white Shari. It’s breathtaking!
Key Rationale Points:
- Tapering: You can use Shari to visually thin a trunk that is too thick or lacks movement.
- Drama: It creates a focal point that draws the eye upward.
- Balance: It balances the “heaviness” of dense foliage with “light” skeletal structures.
- Defect Hiding: As Wikipedia suggests, it can disguise the original trunk after a significant height reduction.
🌲 Top 7 Tree Species Perfect for Shari Techniques
Not every tree wants to go “streaking.” Deciduous trees (like Maples) tend to rot if you expose their heartwood. Bonsai Empire points out that deadwood is almost exclusively used on evergreen trees because deciduous wood rots away over time. We recommend sticking to the “tough guys” of the bonsai world. Check our Bonsai Species Guide for more details on these hardy varieties.
| Rank | Species | Why it Works | Rot Resistance |
|---|---|---|---|
| 1 | Shimpaku Juniper | Extremely resinous wood; twists beautifully. | High ✅ |
| 2 | California Juniper | Naturally occurring massive deadwood. | High ✅ |
| 3 | Yew (Taxus) | Very hard wood that takes carving detail well. | High ✅ |
| 4 | Buttonwood | Tropical “driftwood” king; very unique grain. | Medium-High ✅ |
| 5 | Japanese Black Pine | Rugged look, though harder to carve. | Medium ✅ |
| 6 | Ponderosa Pine | Great for “naturalistic” wild styles. | Medium ✅ |
| 7 | Bald Cypress | Best for “Sabamiki” (hollow trunk) styles. | Medium ✅ |
🛠️ The Surgeon’s Kit: Essential Tools for Carving Deadwood
You wouldn’t perform surgery with a butter knife, right? To get that professional look, we use specific tools that allow for precision and natural-looking textures.
Product Spotlight: Kaneshin Jin Pliers (No. 49)
If you are serious about Shari, you need a pair of Jin pliers. These aren’t your average hardware store pliers.
| Aspect | Rating (1-10) | Notes |
|---|---|---|
| Durability | 10/10 | Hand-forged Japanese steel lasts a lifetime. |
| Precision | 9/10 | Tapered nose allows for grabbing tiny bark strips. |
| Ergonomics | 8/10 | Traditional design; requires some hand strength. |
| Value | 9/10 | An investment tool for serious hobbyists. |
Detailed Analysis: The Kaneshin Jin Pliers are the gold standard. We’ve used the same pair for over a decade. The way the teeth grip the bark without slipping is essential when you’re trying to peel a long, continuous strip of cambium.
Other Essential Tools:
- Graving Chisels: For carving channels and detail.
- Dremel or Rotary Tool: For those who want to speed up the process. We recommend the Dremel 4000 for its variable speed.
- Wire Brushes: To clean the wood and reveal the grain.
👉 Shop Carving Tools on:
- Kaneshin Jin Pliers: Amazon | Kaneshin Official
- Ryuga Carving Set: Amazon | Etsy
- Dremel Rotary Tools: Amazon | Walmart
🔪 Masterclass: 10 Steps to Creating a Breathtaking Shari
Ready to dive in? We’ve ruined enough practice trees over the last 20 years to know exactly how you should approach this. As seen in the featured video, the process requires patience and precision to avoid damaging the living parts of the tree.
- Identify the Life Line: This is the most important step. Find the veins of bark that connect the roots to the living branches. Do not cut these.
- Visualize the Flow: Use a chalk or a marker to draw the Shari. It should follow the natural twist of the trunk.
- Outline the Cut: Use a sharp scalpel or a Ryuga Bonsai Knife to cut through the bark down to the wood.
- The First Peel: Use your Jin pliers to grab a corner of the bark and pull. If it’s spring, it should peel like a banana! 🍌
- Refine the Edges: Ensure the transition between live bark and deadwood is clean.
- Carve the Wood: Use your chisels to create “grain” and “cracks.” Nature doesn’t make smooth surfaces; it makes ridges.
- Clean the Surface: Use a brass wire brush to remove any fuzzy cambium remnants.
- Weathering: Let the wood dry out for a few days. It will naturally start to crack slightly.
- Apply Lime Sulfur: This is the magic juice. It kills fungus and bleaches the wood white.
- Annual Maintenance: Re-apply lime sulfur once a year to keep that “ghostly” glow.
A Note on Timing: While we prefer late spring for easy peeling, Bonsai Empire suggests early spring or late summer to allow the tree to heal wounds quickly. We find that late spring offers the best “slip” of the bark, but always check your local climate!
🧪 Preserving the Ghost: Aftercare and Lime Sulfur Application
Once you’ve carved your masterpiece, you need to protect it. Raw wood will rot if left to the elements. This is where Lime Sulfur comes in. It’s a chemical compound that acts as a fungicide and a bleaching agent.
How to apply Lime Sulfur:
- Wet the wood first: This helps the sulfur soak in evenly and prevents blotching.
- Protect the soil: Put a plastic sheet over the soil. Lime sulfur in the roots is a big ❌.
- Use a dedicated brush: It smells like rotten eggs (seriously, it’s pungent!), so don’t use your favorite paintbrush.
- Add a drop of ink: Some masters add a tiny drop of black India ink to the sulfur to create a more “weathered grey” look rather than “stark white.”
👉 CHECK PRICE on:
⚠️ 5 Fatal Mistakes to Avoid When Peeling Bark
We’ve seen it all at Bonsai Garden™. Avoid these pitfalls to keep your tree in the “living” category:
- Girdling the Tree: Cutting a ring all the way around. This is a death sentence.
- Carving Too Deep: If you cut through the heartwood of a young tree, you might compromise its structural integrity.
- Ignoring the Sap Flow: Always ensure every branch has a “highway” of bark leading to the roots.
- Working on Weak Trees: Never perform Shari on a tree that was recently repotted or is showing signs of stress. ✅ Only work on healthy trees.
- Using Dirty Tools: This can introduce pathogens. Clean your tools with isopropyl alcohol between trees. For more safety tips, visit our Bonsai FAQs.
🌿 Jin vs. Shari vs. Sabamiki: Knowing Your Deadwood Styles
It’s easy to get these confused, but they are distinct techniques. If you’re looking for Bonsai Inspiration and Ideas, understanding these differences is key to creating a cohesive design.
- Jin (神): A dead branch. It looks like a spike or a bleached twig sticking out.
- Shari (舎利): Deadwood on the trunk.
- Sabamiki: A hollowed-out trunk, looking like the tree was split by lightning.
- Tanuki (Phoenix Graft): A controversial technique where a living tree is attached to a piece of deadwood. Wikipedia notes this is often considered non-traditional in Japan but is popular elsewhere.
Comparison Table: Deadwood Styles
| Style | Location | Visual Effect | Difficulty |
|---|---|---|---|
| Jin | Branches/Apex | Aged, weathered tips | Low-Medium |
| Shari | Trunk | Stripped bark, “bones” | Medium-High |
| Sabamiki | Trunk Interior | Hollowed, lightning-struck | High |
| Uro | Trunk/Branch Junctions | Small hollows, knotholes | Low |
But wait—how do you know if your Shari will actually last? Or will it just turn into a mushy mess of rot in three years? We’ll reveal the secret to long-term deadwood preservation in the next section…
🏁 Conclusion

Creating a Shari on your bonsai is more than just a styling technique—it’s a storytelling tool that breathes the spirit of ancient, weather-beaten trees into your miniature masterpiece. As we’ve seen, the process demands respect, patience, and precision. From identifying the vital life lines to carefully peeling bark and preserving the exposed wood with lime sulfur, every step is a dance between artistry and horticulture.
Positives of Using Professional Tools Like Kaneshin Jin Pliers:
- Exceptional durability and precision.
- Designed specifically for bonsai deadwood work.
- Enables clean, controlled bark removal, reducing risk to the tree.
Negatives:
- Requires an initial investment and some practice to master.
- Ergonomics may challenge beginners with smaller hands.
Our confident recommendation? If you’re serious about Shari, invest in quality tools like the Kaneshin Jin Pliers and a good carving set. They pay dividends in results and tree health.
Remember the unresolved question about longevity: Will your Shari last? The answer lies in aftercare. Proper lime sulfur application and annual maintenance preserve the deadwood, preventing rot and maintaining that ghostly white contrast for years to come.
So, are you ready to reveal the “bones” of your bonsai and tell its story of resilience? With the right knowledge, tools, and a bit of courage, your tree will wear its scars like a badge of honor. 🌿✨
🔗 Recommended Links
👉 Shop Essential Shari Tools:
- Kaneshin Jin Pliers: Amazon | Kaneshin Official Website
- Ryuga Bonsai Carving Knife Set: Amazon | Etsy
- Dremel 4000 Rotary Tool: Amazon | Walmart
- Bonsai Lime Sulfur: Amazon | Etsy
Recommended Books for Deepening Your Bonsai Knowledge:
- Bonsai Techniques I & II by John Naka — Amazon
- The Art of Bonsai by Yuji Yoshimura — Amazon
- Bonsai: The Art of Growing and Keeping Miniature Trees by Peter Chan — Amazon
❓ FAQ: Your Burning Shari Questions Answered

What is the Shari technique in bonsai cultivation?
Shari is a traditional bonsai technique involving the deliberate removal of bark from sections of the trunk to expose the underlying deadwood. This mimics natural scars caused by lightning, weather, or animal damage, adding a sense of age, drama, and resilience to the tree. It’s a way to tell the story of survival through the tree’s “bones,” enhancing the visual narrative of your bonsai.
How do you create a Shari effect on a bonsai tree?
Creating Shari involves several careful steps:
- Identify the life lines (areas where bark must remain to keep the tree alive).
- Mark the intended Shari area following the natural trunk movement.
- Use sharp tools like carving knives or Jin pliers to remove bark without damaging living tissue.
- Carve and texture the exposed wood for a natural look.
- Apply lime sulfur to preserve and bleach the wood.
- Maintain annually to prevent rot and maintain aesthetics.
This process requires patience and practice to avoid harming your bonsai.
Which bonsai species are best suited for Shari techniques?
Evergreens with rot-resistant wood are ideal. The top picks include:
- Shimpaku Juniper (Juniperus chinensis)
- California Juniper
- Japanese Black Pine
- Yew (Taxus)
- Buttonwood
- Ponderosa Pine
- Bald Cypress
Deciduous trees generally do not tolerate Shari well due to their softer wood and susceptibility to rot. For more on species suitability, see our Bonsai Species Guide.
What tools are needed for performing Shari on bonsai trees?
Essential tools include:
- Jin Pliers: For gripping and peeling bark strips (e.g., Kaneshin Jin Pliers).
- Carving Knives and Chisels: To outline and texture the deadwood.
- Rotary Tools (Optional): Like the Dremel 4000 for faster carving.
- Wire Brushes: To clean and reveal wood grain.
- Lime Sulfur: For preservation and whitening.
Using the right tools ensures clean work and protects your tree’s health.
How does Shari enhance the aesthetic of a bonsai tree?
Shari creates a striking contrast between the living bark and bleached deadwood, adding visual drama and a sense of ancient age. It introduces texture and depth, making the bonsai appear weathered by time and elements. This aligns with the Japanese aesthetic of wabi-sabi, appreciating imperfection and impermanence, and helps balance dense foliage with skeletal structure.
Can Shari technique help in preserving old bonsai trees?
While Shari itself is primarily an aesthetic technique, it can indirectly aid preservation by:
- Hiding defects or scars from past damage.
- Redirecting growth by removing problematic bark.
- Encouraging callus formation around the deadwood, strengthening the tree’s structure.
However, improper Shari can harm the tree, so it should only be done on healthy specimens with proper aftercare.
What are the common mistakes to avoid when using Shari on bonsai?
Avoid these pitfalls:
- Girdling the tree: Never remove bark in a full ring around the trunk.
- Cutting too deep: Avoid damaging the heartwood or vital sapwood.
- Ignoring sap flow: Ensure living branches maintain connection to roots.
- Working on stressed trees: Only perform Shari on healthy, well-established bonsai.
- Using dirty tools: Always sterilize tools to prevent infection.
For more detailed tips, visit our Bonsai FAQs.
Additional FAQ Depth
How often should lime sulfur be reapplied on Shari?
Typically, lime sulfur should be reapplied once a year, preferably in early spring before new growth starts. This maintains the protective white coating and prevents fungal growth.
Is Shari suitable for indoor bonsai?
Shari is best suited for outdoor bonsai species that experience natural weathering. Indoor bonsai often lack the environmental conditions (sunlight, airflow) needed to maintain deadwood health and appearance.
Can Shari be reversed if I change my mind?
Unfortunately, no. Once bark is removed and wood exposed, it cannot be replaced. Always practice on less valuable specimens or branches before attempting on prized bonsai.
📚 Reference Links
- Deadwood Bonsai Techniques – Wikipedia
- Bonsai Empire: Deadwood Styling
- Wazakura Japan: Bonsai Techniques – Jin and Shari
- Kaneshin Official Website
- Bonsai Garden™ – Bonsai Care Basics
- Bonsai Garden™ – Bonsai Species Guide
- Bonsai Garden™ – Bonsai FAQs
We hope this comprehensive guide has empowered you to confidently explore the Shari technique and bring the ancient spirit of deadwood into your bonsai artistry. Happy sculpting! 🌳✨