Support our educational content for free when you buy through links on our site. Learn more

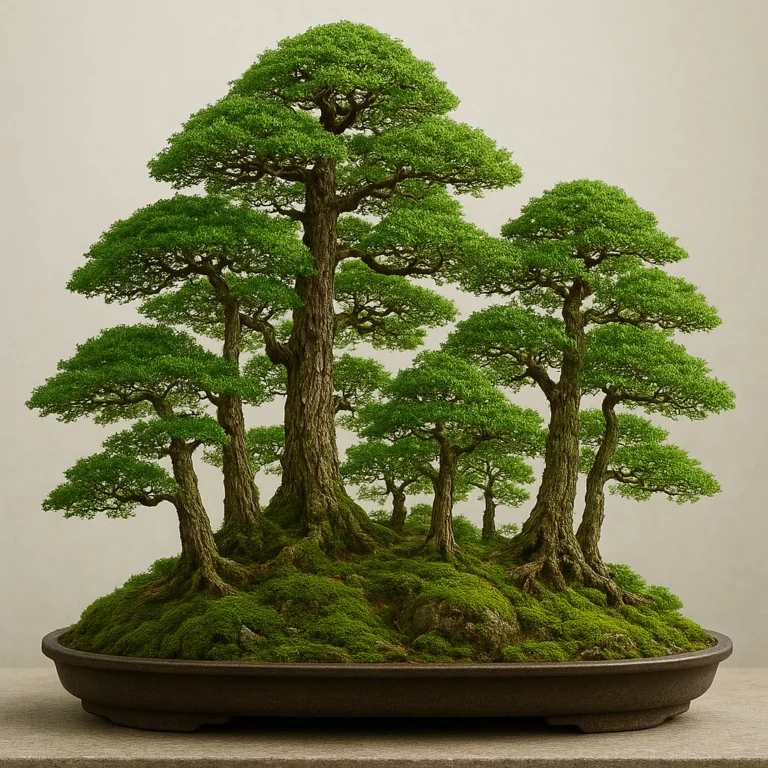
Have you ever wondered how a single tree can tell the story of a fallen giant reborn as a thriving forest? At Bonsai Garden™, we’ve watched in awe as a humble, horizontal trunk transforms into a captivating Ikadabuki—a living testament to nature’s resilience. The raft bonsai style isn’t just a technique; it’s a dramatic narrative of survival, where a tree that once lay defeated on the forest floor now sprouts new life from its own body, creating a miniature ecosystem in a single pot. Whether you are a seasoned artist looking to master the sinuous Netsunagari or a beginner eager to turn a single trunk into a multi-trunk masterpiece, this guide is your compass.
In this comprehensive journey, we’ll walk you through every step of the transformation, from selecting the perfect flexible specimen to the meticulous wiring that prevents your “forest” from looking like a row of soldiers. We’ll reveal the secret of air layering to accelerate root growth, share our favorite species like the rugged Scots Pine and the elegant Japanese Maple, and even debunk the myth that this style is only for experts. Did you know that the most famous historical example of this style was restyled in 1937 by the legendary Isaburo Nishiyama? We’ll show you how to achieve that same timeless character in your own garden.
Ready to turn your gardening skills into a work of art? By the end of this article, you’ll have the confidence to lay your first trunk horizontally and watch it rise again.
Key Takeaways
- The Raft Style (Ikadabuki) transforms a single fallen trunk into a multi-trunk forest, mimicking nature’s resilience and offering a unique storytelling element in bonsai art.
- Species Selection is Critical: Choose trees with flexible trunks and strong branching one side, such as Japanese White Pine, Scots Pine, or Japanese Maple, for the best results.
- Root Development is the Foundation: Success relies on encouraging new roots along the horizontal trunk through partial burial and advanced techniques like air layering.
- Design Matters: Avoid the “soldier row” look by varying trunk heights and spacing to create a natural, organic miniature forest illusion.
- Patience Pays Off: While the initial transformation takes months, developing a mature, convincing raft style is a long-term journey that rewards persistence with a stunning, age-rich aesthetic.
Table of Contents
- ⚡️ Quick Tips and Facts
- 🌊 The Raft Bonsai Style: A Driftwood Journey Through History
- 🌳 Why Choose the Raft Style? Understanding the Unique Aesthetic
- 🪵 Selecting the Perfect Specimen: Species and Root Systems for Raft Bonsai
- ✂️ Step-by-Step Guide: How to Create a Raft Bonsai from Scratch
- 🔧 Essential Tools and Materials for Raft Transformation
- 🌱 Root Pruning and Wiring Techniques Specific to Raft Styles
- 💧 Watering, Fertilizing, and Care for Multi-Trunk Raft Arrangements
- 🐛 Common Pests, Diseases, and Troubleshooting Raft Health
- 🎨 Design Principles: Balancing Trunk Spacing and Foliage Pads
- 🔄 Advanced Techniques: Converting Single Trunks into Rafts
- 📚 Raft Bonsai Reading Material: Top Books and Resources for Mastery
- 🛒 Where to Buy Raft Bonsai Supplies and Pre-Bonsai Stock
- 🏆 Conclusion: Mastering the Art of the Floating Forest
- 🔗 Recommended Links
- ❓ FAQ: Your Raft Bonsai Questions Answered
- 📖 Reference Links
Body
⚡️ Quick
Tips and Facts
Welcome, fellow tree enthusiasts, to the captivating world of raft bonsai! Here at Bonsai Garden™, we’ve spent countless hours nurturing these miniature forests, and we’re thrilled to share our insights. The raft style
, or Ikadabuki in Japanese, is truly a testament to nature’s resilience and artistic beauty. It mimics a tree that has fallen, yet continues to thrive, sending up new trunks from its recumbent body. It’
s a style that tells a story, a living sculpture of perseverance and rebirth. Ready to dive in? Let’s get some quick facts under our belts!
- ✅ Ikadabuki (Raft Style): This
term describes a bonsai where the main trunk lies horizontally, with branches growing vertically to form new “trunks.” It’s often called the “fallen tree style” or “multi-trunk bonsai.” - ✅ **
Netsunagari (Sinuous Root Style)**: A specific variation of the raft style, characterized by a curved, winding main trunk that mimics a naturally fallen tree. - ❌ Not a Cl
ump Style: While both have multiple trunks, the raft style originates from a single fallen trunk, whereas a clump style (Kabudachi) typically has multiple trunks emerging from a single point above the soil. - ✅ Historical Significance: The *
netsuranari* (sinuous root) style gained prominence in 1937, notably with a Japanese White Pine restyled by Isaburo Nishiyama. - ✅ **Patience is Key
**: Developing a truly convincing raft bonsai takes time, often years, but the journey is incredibly rewarding. Expect roots to establish within six months for newly laid trunks. - ✅ Species Versatility: Many species
can be adapted to the raft style, including pines, maples, and cotoneasters, offering diverse aesthetic possibilities. - ✅ Storytelling through Design: The raft style beautifully illustrates
“how life can react to natural misfortune,” creating a powerful and evocative composition.
🌊 The Raft Bonsai Style: A Driftwood Journey Through History
Imagine walking through an ancient forest after a fierce storm. A mighty tree, perhaps centuries old, has succumbed to the wind’s fury, its massive trunk now lying prone
on the forest floor. Yet, from its horizontal body, new shoots emerge, reaching for the sun, slowly transforming into a new generation of trees. This breathtaking natural phenomenon is the very essence of the raft bonsai style, known in Japanese as Ik
adabuki (raft style) or Netsunagari (sinuous root style).
Here at Bonsai Garden™, we believe
the raft style is one of the most poetic and profound expressions in bonsai art. It’s not just about shaping a tree; it’s about capturing a moment of resilience, a narrative of survival. The style truly demonstrates “how life can
react to natural misfortune,” transforming adversity into a stunning display of vitality.
Historically, the concept of the raft style has deep roots. While trees naturally fall and regenerate, its formal recognition in bonsai art became more prominent in
the early 20th century. The Netsunagari, or sinuous root style, which features a curved, winding trunk mimicking a natural fallen tree, was notably brought to light in 1937. A famous Japanese auction
showcased a remarkable Japanese White Pine (Pinus parviflora) that had been masterfully restyled by Isaburo Nishiyama into this captivating form. This event helped distinguish it from the older, more common
clump style, cementing its place as a unique and evocative bonsai expression.
There are primarily two variations within the raft style:
- Sinuous Root Style (Netsunagari): This is the more artistic and frequently
seen variation. The main trunk lies horizontally in a serpentine or undulating pattern, creating a dynamic and aged appearance. Branches growing upwards along this winding trunk become the individual “trees” of the miniature forest. This style often evokes
a sense of ancient wisdom and natural flow. - Straight Line Style: As the name suggests, this variation involves the main trunk lying in a relatively straight line. While less common in artistic bonsai, it still beautifully represents a fallen tree
and can create a very powerful, disciplined forest composition.
Both variations share the core technique: laying a tree on its side and encouraging it to root along the recumbent trunk. The branches on the underside are
typically removed to allow the tree to sit comfortably, while the remaining branches are carefully developed into the new, upright trunks. It’s a journey of transformation, turning a single tree into a captivating miniature landscape. For more
inspiration on how different styles tell different stories, check out our section on Bonsai Inspiration and Ideas.
🌳 Why Choose the Raft Style? Understanding the Unique Aesthetic
So, why would a bonsai enthusiast choose the raft style over,
say, a formal upright or a cascade? Ah, my friends, the answer lies in its unparalleled ability to tell a story and evoke powerful emotions! We’ve seen countless reactions to well-executed raft bonsai, from quiet contemplation to outright
awe. It’s a style that transcends mere aesthetics, offering a glimpse into the enduring spirit of nature.
The unique aesthetic of the raft style is truly captivating. It creates a composition that feels incredibly mature and ancient, even with
relatively young material. The horizontal trunk, often with its “cortex lived” (living bark) exposed, immediately suggests a history, a struggle, and ultimately, triumph. The way the multiple upright
trunks emerge from this single, fallen parent creates a sense of a “great quantity of branches” that form a dense, natural-looking miniature forest. Unlike some highly stylized forms, a well-crafted
raft bonsai often possesses a wonderfully non-artificial appearance, making it feel like a piece of wild nature brought indoors.
Here are a few compelling reasons why we adore the raft style:
Narrative Power**: It’s a living narrative of survival and rebirth. The fallen trunk speaks of challenges, while the upright branches symbolize new life and resilience. This storytelling aspect makes it incredibly engaging.
- Forest in a Pot: The
raft style is arguably the easiest way to create a convincing miniature forest (Yose-ue) from a single piece of material. You get the illusion of many trees without the complexity of planting and maintaining numerous individual specimens. - Dynamic
Visual Interest: The horizontal movement of the main trunk, especially in the sinuous root style, creates incredible visual flow and interest. It draws the eye along its length, leading to the various upright trunks. - **Age and Character
**: Even with younger material, the raft style can convey immense age and character. The exposed horizontal trunk immediately suggests a veteran tree. - Unique Display: A well-developed raft bonsai stands out in any collection. It’s a conversation
starter, a piece of living art that demands attention and contemplation.
While other styles have their own beauty, the raft style offers a distinct blend of drama, naturalism, and profound symbolism. It challenges us as growers to think beyond the single
trunk, to envision a whole ecosystem within a single pot. For those looking to create a truly impactful and meaningful bonsai, the raft style is an exceptional choice. To learn more about how different elements contribute to the overall beauty of a bonsai,
explore our Bonsai Display and Aesthetics section.
🪵 Selecting the Perfect Specimen: Species and Root Systems for Raft Bonsai
Choosing the right tree is paramount when embarking on your raft bonsai journey.
Not every tree is destined for this horizontal transformation, but many species lend themselves beautifully to the style. Over the years, we’ve experimented with a wide array of plant material, and we’ve learned that some characteristics are simply non-negotiable for
success.
Ideal Species for Raft Bonsai:
Many species can be coaxed into the raft style, but some are particularly well-suited due to their natural growth habits, flexibility, and ability to root easily along the trunk.
- Japanese White Pine (Pinus parviflora): This species holds historical significance in the netsuranari style. Its flexible branches and ability to back-bud make it an excellent choice for developing multiple trunks.
- Scots Pine (Pinus sylvestris): As demonstrated in a stunning progression by Stefano Frisoni, Scots Pine can create incredibly mature and natural-looking raft compositions. Its rugged bark and strong
branching are ideal. - Japanese Maple (Acer palmatum): Known for its beautiful autumn color and fine ramification, Japanese Maples are fantastic for creating elegant raft styles. Peter Adams,
author of Bonsai with Japanese Maples, extensively covers raft creation with these trees. - Hawthorn (Crataegus): While noted as a rare species for this style, a
unique Hawthorn raft by John Pitt showcased how even less common choices can yield spectacular results, especially with creative potting. - Rockspray Cotoneaster (Cotoneaster horizontalis): Bill Valavanis of
International Bonsai has successfully created raft styles with Cotoneaster, often burying the original trunk almost completely. Its spreading habit lends itself well to the horizontal form. - Junipers (e.g., San Jose Juniper): These evergreens, with their flexible branches and resilience, are also excellent candidates, as seen in various demonstrations.
Key Characteristics to Look For:
When you’re out scouting
for potential raft material, keep these traits in mind:
- Flexible Trunk and Branches: You’ll be laying the main trunk horizontally and bending branches upwards. A tree with some natural flexibility will make this process much easier and reduce
the risk of breakage. - Good Branching Along One Side: Ideally, you want a tree with branches already growing predominantly on one side of the trunk. This side will become the “top” when the tree is laid
horizontally, and these branches will be developed into your new upright trunks. - Vigorous Root System: A strong, healthy root ball is crucial. Remember, some of the original roots must remain anchored in the ground until new
roots form along the fallen trunk. A robust root system provides the initial stability and nutrient uptake needed for the tree to adapt to its new orientation. - Interesting Trunk Movement: Even before it’s laid down
, a trunk with some natural curves or character can enhance the final sinuous root effect. Don’t just look for straight lines! - Overall Health: Always start with a healthy tree. A stressed or weak specimen will struggle to
adapt to the significant changes involved in creating a raft bonsai.
We often recommend starting with material that has a good amount of lower branching or even suckers that can be trained upwards. This gives you more options for developing your “new”
trunks. For beginners, choosing a resilient species like a juniper or a robust maple can make the learning curve a bit gentler. For more guidance on selecting healthy trees, visit our Bonsai for Beginners section.
✂️ Step-by-Step Guide: How to Create a Raft Bonsai from Scratch
Creating a raft bonsai is a truly transformative process, turning a single tree into a miniature forest. It requires vision, patience, and a bit of horticultural
wizardry. Don’t worry, we’ll walk you through it, step by step, drawing on our collective experience and the wisdom of other masters. This isn’t a race; it’s a journey!
1.
Initial Assessment and Visioning (The “Aha!” Moment)
Before you even touch a tool, take a long, hard look at your chosen tree. Rotate it, visualize it lying on its side. Which branches will become your new
trunks? Which side will be the “top” of your horizontal trunk? Peter Adams eloquently describes the raft method: “The raft method… is formed by laying a tree on its side and encouraging it to root along the recumbent trunk.
The branches on the underside of the old trunk are removed to facilitate it lying comfortably in the new posture. Other branches are left and are developed into trees.” This initial vision is crucial.
2. Preparing the Tree
for its New Orientation
- Root Pruning: Carefully remove the tree from its pot. Gently comb out the roots, removing any circling or overly thick roots. You need enough root mass to sustain the tree, but also enough flexibility
to lay it down. The key is to ensure some roots from the original root mass remain anchored in the ground until new roots form along the fallen trunk. - Branch Selection and Pruning: This
is where the magic begins! - Identify the branches that will become your new upright trunks. These should ideally be on the side that will face upwards when the tree is laid horizontally.
- Remove branches on the underside
of the old trunk. This allows the tree to lie comfortably and flat in its new position. - Trim any unwanted foliage or branches that don’t fit your vision for the new upright trunks. The
first YouTube video we watched on creating a raft bonsai demonstrates this beautifully, starting with a San Jose juniper and carefully trimming unwanted foliage.
3. Laying the Trunk Horizontally
- Positioning: Gently
lay the main trunk horizontally in your chosen training pot or box. Ensure it sits stable. Sometimes, a shallow trench in the soil helps. - Securing: Use thick wire or stakes to secure the main trunk firmly in its
new horizontal position. You don’t want it rocking or shifting.
4. Encouraging New Root Growth (The Lifeblood of Your Raft)
This is a critical step. The goal is for the horizontal trunk to develop
new roots along its entire length, effectively creating a new, extensive root system for your “forest.”
-
Partial Burial: Gently cover the horizontal trunk with a suitable bonsai soil mix. Leave the base of your future upright trunks exposed.
-
Air Layering Technique: For stubborn areas or to accelerate root development, consider air layering sections of the horizontal trunk. The YouTube video highlights this technique, where rooting hormone is applied to aid the process. This involves making incisions, applying rooting hormone (like Clonex Rooting Gel), and wrapping the area with sphagnum moss and plastic.
-
Rooting Hormone: Apply a good quality rooting hormone (e.g., Hormex Rooting Powder) to any cuts or areas where you want to encourage new roots.
-
Patience: The creator in the video emphasizes patience, stating that the roots should cover the base within six months. This isn’t an overnight transformation!
5. Developing the Upright Trunks (Your Miniature Forest)
-
Wiring: Once the main trunk is secured, it’s time to wire your selected branches upwards
. This is where the “very meticulous” wiring technique comes in, as highlighted by Stefano Frisoni. Use copper wire (or aluminum for beginners) to gently bend the branches into upright positions, ensuring they don’t
overlap and create an “optical impact effect.” The goal is a natural, balanced appearance. -
Branch Spacing: Pay attention to the spacing of your new trunks. Avoid a uniform, “soldiers
in a row” look. Vary heights and positions for a more natural forest feel. The video showcases a finished raft bonsai with three taller trees on one side and shorter ones on the other, creating a miniature forest effect. -
Foliage Development: As the new trunks grow, prune and wire their foliage to create distinct pads, mimicking the canopy of individual trees.
-
Deadwood Creation (Jin and Shari): If you
‘ve removed any significant branches, consider converting them into deadwood (Jin and Shari). This adds incredible age and character to your raft. Stefano Frisoni, when restyling a Pinus sylvestris
raft, removed a low frontal branch and converted it into deadwood, making the front “more open,” “balanced,” and “intriguing.”
6. Ongoing Care and Refinement
*
Watering and Fertilizing: Maintain consistent watering and a regular fertilization schedule to promote strong growth.
- Repotting: As new roots develop along the horizontal trunk, you may eventually transition to a shallower, wider bonsai pot that
truly showcases the raft style. - Continuous Wiring and Pruning: Raft bonsai require ongoing wiring and pruning to maintain their shape and encourage ramification.
Creating a raft bonsai is a journey of several years, but the reward
is a living masterpiece that tells a compelling story of resilience and beauty. For more detailed insights into general bonsai care, don’t forget to check out our Bonsai FAQs.
🔧 Essential Tools and Materials for Raft Transformation
Embarking on the raft bonsai
journey requires more than just enthusiasm; you’ll need the right tools and materials to ensure a smooth and successful transformation. Think of it like building a miniature ship – you wouldn’t set sail without your compass and sturdy planks, right? Here at
Bonsai Garden™, we’ve curated our toolkit over decades, and we’re happy to share our essentials.
Our Go-To Tools:
- Concave Cutters: Absolutely indispensable for making clean, flush
cuts that heal beautifully. These are crucial for removing unwanted branches from the underside of your horizontal trunk and for shaping the new uprights. We recommend high-quality Japanese steel concave cutters for precision and durability. - Wire Cutters:
Dedicated wire cutters are a must. Using your good pruning shears on wire will dull them quickly. Choose a pair that can handle various wire gauges. - Pruning Shears/Scissors: For fine detail work, trimming leaves
, and smaller branches on your new uprights. A sharp pair makes all the difference. - Grafting Knife (or a very sharp utility knife): Essential if you plan on air layering sections of your horizontal trunk to encourage new
roots. A clean cut is vital for successful rooting. - Root Hook/Chopstick: For gently teasing out roots during initial root pruning and when repotting.
- Pliers (for thicker wire): Sometimes, especially with thicker gauge wire, pliers can help you get a better grip and apply leverage.
Crucial Materials:
- Bonsai Wire: This is your sculptor’s clay! You
‘ll need various gauges (thicknesses) for wiring the main trunk into position and for shaping the new upright branches. We personally swear by Bonsai Aesthetics Wire for its quality and malleability. It’s available in convenient
1-kilogram rolls.
- Aluminum Wire: Great for beginners as it’s softer, easier to apply, and less likely to damage the bark. It’s also reusable.
Copper Wire: Preferred by many advanced artists for its superior holding power and ability to set branches more permanently. Stefano Frisoni emphasizes “very meticulous” copper wiring to avoid overlapping and ensure a natural appearance in raft styles.
- 👉 Shop Bonsai Wire on:
- Bonsai Aesthetics Wire (Aluminum): Amazon.com/Bonsai-Aesthetics-Aluminum-Wire | Etsy.com/Bonsai-Aesthetics-Aluminum-Wire
- Bonsai Aesthetics Wire (Copper): Amazon.com/Bonsai-Aesthetics-Copper-Wire | Etsy.com/Bonsai-Aesthetics-Copper-Wire
-
Rooting Hormone: If you’re air layering or encouraging new roots along the trunk, a good rooting hormone (powder or gel) is indispensable. Brands like Clon
ex Rooting Gel or Hormex Rooting Powder are excellent choices. -
Bonsai Soil Mix: A well-draining, aerated soil mix is vital for healthy root development, especially when the
trunk is partially buried. We often use a mix of akadama, pumice, and lava rock. -
Training Pot or Box: Initially, you might not use a fancy bonsai pot. A sturdy plastic training pot or even a wooden
box provides ample space for the horizontal trunk to develop its new root system. -
Sphagnum Moss and Plastic Wrap: If you’re air layering, these are essential for creating the moist environment needed for roots to form.
-
Stakes or Guy Wires: For securing the main trunk firmly in its horizontal position, especially if it’s a larger or more resistant specimen. Bamboo sticks are often used for support.
Having these tools and materials on hand will make your raft bonsai creation process much more efficient and enjoyable. Investing in quality tools is always a good idea; they’ll last longer and perform better, making your bonsai journey a smoother one.
<
a id=”-root-pruning-and-wiring-techniques-specific-to-raft-styles”>
🌱 Root Pruning and Wiring Techniques Specific to Raft Styles
Ah, the delicate dance of roots and wire! In
raft bonsai, these two elements are not just about health and aesthetics; they’re about fundamentally redefining the tree’s structure and ensuring its long-term survival in a horizontal orientation. It’s a nuanced process that demands both a gentle
hand and a clear vision.
Root Pruning for the Horizontal Life
When you first unpot your chosen material for a raft style, you’ll notice it’s designed for vertical living. Our job is to adapt it.
Initial Assessment: After gently removing the tree from its pot, carefully inspect the root ball. The crucial point here, as Peter Adams notes, is that some roots from the original root mass must remain anchored in the ground until new roots
form underneath the fallen trunk. Don’t get carried away with aggressive root pruning at this stage!
- Combing and Untangling: Use a root hook or chopstick to gently comb out the roots
. Remove any thick, circling, or damaged roots that won’t contribute to the new horizontal spread. - Creating a Flat Base: The goal is to create a relatively flat underside on the root ball that will allow the trunk
to sit stably in its horizontal position. This might involve carefully trimming some roots from the bottom or sides. - Encouraging New Surface Roots: Once the trunk is laid down and partially buried, the real work of root development begins.
The soil covering the horizontal trunk will encourage new adventitious roots to form along its length. This is where the magic happens, as these new roots will eventually become the primary support system for your “forest.” - Air Layering
for Acceleration: As mentioned earlier, air layering specific sections of the horizontal trunk can significantly speed up the development of new roots. This technique, where rooting hormone is applied to incisions and wrapped in sphagnum moss, is a powerful tool in
our arsenal.
Wiring for the Upright Forest
Wiring in raft bonsai is a multi-stage process, focusing first on the main trunk’s position and then on shaping the individual uprights.
**
- Securing the Main Horizontal Trunk:**
- Thick Gauge Wire: Use substantial aluminum or copper wire (or even stakes) to firmly anchor the main trunk in its horizontal position within the training pot or box. This is
critical to prevent any movement that could disrupt new root formation. - Guy Wires: For larger, more resistant trunks, guy wires attached to the pot rim can provide additional stability, pulling the trunk down gently. Bamboo sticks can
also be used for support.
2. Shaping the New Upright Trunks:
- Branch Selection: You’ve already identified the branches that will become your uprights. Now, it
‘s time to give them their vertical direction. - Meticulous Wiring: Stefano Frisoni’s advice on wiring for Pinus sylvestris raft styles is golden: the positioning must be “very meticulous” to
avoid overlapping. We couldn’t agree more! Each branch, now a nascent trunk, needs its own space and clear definition. - Wire Application: Apply wire from the base of the branch,
winding it evenly and at a 45-degree angle towards the tip. Ensure the wire is snug but not biting into the bark. - Gentle Bending: Slowly and carefully bend the wired branches upwards. Avoid
sharp kinks. The aim is to create a natural, slightly varied height and spacing among your new trunks. - Preventing “Optical Impact Effect”: The goal is to prevent an “optical impact effect” where the vegetation appears artificial or
crowded. Each upright should look like a distinct, individual tree, even though they share a common origin. - Establishing Foliage Pads: Once the vertical direction is set, you’ll also wire the secondary
branches to create distinct, well-defined foliage pads for each “tree.” This helps to further enhance the miniature forest illusion. - Regular Inspection: Check your wiring regularly (every few weeks to months, depending on species and growth rate)
to ensure it’s not cutting into the bark. Remove and reapply as needed.
Mastering these root pruning and wiring techniques is fundamental to creating a convincing and healthy raft bonsai. It’s about guiding nature, not forcing it, and understanding
how the tree will respond to your interventions.
💧 Watering, Fertilizing, and Care for Multi-Tr
unk Raft Arrangements
Caring for a raft bonsai is a bit like tending a small forest – you’ve got multiple “trees” drawing resources from a shared, elongated root system. This unique arrangement means your watering and fertilizing strategies
need to be thoughtful and consistent. Here at Bonsai Garden™, we’ve learned that a little extra attention to these details goes a long way in ensuring your floating forest thrives.
Watering: The Lifeblood of Your Raft
Because
a raft bonsai often occupies a wider, shallower container, and has an extended horizontal trunk developing roots, its watering needs can be slightly different from a single-trunk bonsai.
- Consistency is Key: We cannot stress this enough. Allow
the top layer of soil to dry out slightly between waterings, but never let the entire root ball become bone dry. Check the soil moisture daily, especially during warm, windy weather. - Thorough Soaking: When you water, do
so thoroughly until water drains from all the drainage holes. This ensures all parts of the extensive root system, including those developing along the horizontal trunk, receive adequate moisture. - Even Distribution: Because the root system is spread out, make
sure you’re watering evenly across the entire surface of the soil, not just in one spot. - Humidity: Many raft species, especially evergreens, appreciate higher humidity. Consider placing your raft bonsai on a humidity tray filled with pebbles and
water, ensuring the pot itself isn’t sitting in standing water.
Fertilizing: Fueling Your Forest’s Growth
With multiple upright trunks and a desire for dense, healthy foliage, a consistent fertilization regimen is vital.
Balanced Approach**: We generally recommend a balanced fertilizer (e.g., NPK 10-10-10 or similar) during the growing season (spring through late summer).
- Organic vs. Chemical: Both
organic (e.g., Biogold, Rape Seed Cakes) and chemical fertilizers (e.g., Osmocote, Miracid for acid-loving plants) can be used. Organic fertilizers release nutrients slowly, building soil health, while chemical
fertilizers offer more immediate uptake. We often use a combination. - Application: Follow the manufacturer’s instructions carefully. For liquid fertilizers, dilute to the recommended strength. For solid fertilizers, place them evenly around the soil surface.
Reduced Fertilization: Reduce or stop fertilizing during the dormant season (late fall and winter) to allow the tree to rest.
- Specific Needs: Some species, like pines, prefer a slightly lower nitrogen fertilizer in
late summer to promote hardening off for winter. Always research the specific needs of your chosen species.
General Care: Nurturing Your Miniature Ecosystem
- Sunlight: Most raft bonsai species thrive in ample sunlight. Aim for at least
4-6 hours of direct sunlight daily. However, in extremely hot climates, some afternoon shade might be beneficial to prevent scorching, especially for maples. - Air Circulation: Good air circulation is crucial to prevent fungal diseases,
especially with the dense foliage of a multi-trunk arrangement. Ensure your bonsai isn’t crammed into a corner or surrounded by other plants too closely. - Winter Protection: Depending on your climate and species, winter protection is essential.
This could mean moving deciduous rafts into a protected garage or unheated shed, or placing evergreens in a cold frame or greenhouse. Protect the root system from freezing solid. - Repotting: Repotting frequency will depend on the
species and growth rate, but generally, raft bonsai are repotted every 2-4 years. When repotting, focus on maintaining a healthy, fibrous root system and carefully re-anchoring the horizontal trunk. - Need
le Cleaning: For pines, regular needle cleaning (removing old needles, leaving only the newest growth) is a technique used to make the plant neater, stimulate dormant buds, and allow sunlight to penetrate the inner parts of the plant, preventing “empt
ying of the internal part.” This is a fantastic tip for maintaining the vitality and aesthetic of your pine rafts.
Consistent care, tailored to the unique structure of your raft bonsai, will ensure its health and beauty for years
to come. For more foundational knowledge, explore our Bonsai Care Basics section.
🐛 Common Pests, Diseases, and Troubleshooting Raft Health
Even the most meticulously cared-for raft bonsai can sometimes encounter unwelcome guests or health challenges. It
‘s an inevitable part of gardening, but with knowledge and vigilance, you can keep your miniature forest thriving. Here at Bonsai Garden™, we’ve battled our share of aphids and fungal woes, and we’re here to share our battle
-tested strategies.
Common Pests: The Uninvited Guests
Raft bonsai are susceptible to the same pests that plague other bonsai styles. The key is early detection!
- Aphids: These tiny, soft-bodied insects cluster
on new growth, sucking sap and causing distorted leaves. They often leave behind a sticky residue called honeydew. - Solution: A strong spray of water can dislodge them. For heavier infestations, use insecticidal soap or
neem oil. - Spider Mites: These microscopic pests thrive in hot, dry conditions. Look for fine webbing on foliage and tiny yellow or brown spots on leaves.
- Solution: Increase humidity, mist foliage
regularly, and use insecticidal soap or horticultural oil. - Scale Insects: These look like small, oval bumps on stems and leaves. They also suck sap and produce honeydew.
- Solution: For
light infestations, manually scrape them off. For heavier ones, horticultural oil or systemic insecticides may be necessary. - Mealybugs: Cottony white masses in leaf axils or on stems indicate mealybugs. They’re sap
-suckers and can weaken your tree. - Solution: Dab with rubbing alcohol on a cotton swab for small infestations. Insecticidal soap or neem oil for larger issues.
Prevention is Your Best Friend: Regularly
inspect your raft bonsai, especially the undersides of leaves and new growth. A keen eye can catch problems before they escalate. Good air circulation, as mentioned in our care section, also helps deter many pests.
Common Diseases: The
Invisible Threats
Fungal and bacterial diseases can sometimes affect raft bonsai, often exacerbated by poor air circulation or excessive moisture.
- Powdery Mildew: A white, powdery coating on leaves, common in humid conditions with poor airflow
. - Solution: Improve air circulation, reduce humidity, and use a fungicidal spray.
- Root Rot: Often caused by overwatering or poorly draining soil. Symptoms include yellowing leaves, wilting,
and a general decline in health. - Solution: Repot into fresh, well-draining soil, prune away any mushy, foul-smelling roots, and adjust your watering habits.
- C
anker: Sunken, discolored lesions on branches or trunks, often caused by fungal or bacterial pathogens entering through wounds. - Solution: Prune out infected branches well below the canker. Sterilize tools between cuts.
Troubleshooting Raft Health: What’s Going On?
Sometimes, your raft bonsai might look unwell, and it’s not immediately obvious if it’s a pest, disease, or cultural issue.
- Yellowing
Leaves: - Cause: Could be overwatering (root rot), underwatering, nutrient deficiency (especially nitrogen), or natural shedding of old leaves.
- Action: Check soil moisture, review your fertilization schedule,
and inspect roots if overwatering is suspected. - Branch Dieback:
- Cause: Can be a sign of root issues, disease, pest infestation, or insufficient light.
- Action: Inspect
for pests, check roots, ensure adequate light and air circulation. Prune dead branches cleanly. - Lack of Vigor/Stunted Growth:
- Cause: Often points to insufficient light, inadequate fertilization, poor soil
, or root problems. - Action: Review all aspects of your care regimen. Consider a soil refresh or light root prune if the soil is old.
Expert Tip: Needle Cleaning for Pines!
For pine raft
bonsai, Stefano Frisoni highlights the importance of needle cleaning. This involves removing all old needles, leaving only those generated in the last year. This practice makes the plant neater, stimulates the “awakening of sleeping gems” (dormant buds), and allows solar light to penetrate the internal parts of the plant, preventing “emptying of the internal part” of the tree. It’s a fantastic way to maintain the health and aesthetic density
of your pine rafts.
Remember, a healthy bonsai is more resistant to pests and diseases. Provide optimal light, water, nutrients, and air circulation, and your raft bonsai will reward you with years of robust beauty.
🎨 Design Principles: Balancing Trunk Spacing and Foliage Pads
Designing a raft bonsai is akin to composing a miniature symphony – every element must play
its part in harmony to create a compelling and naturalistic scene. It’s not just about getting trees to grow upwards from a horizontal trunk; it’s about crafting an illusion, a believable slice of a forest. Here at Bonsai Garden
™, we’ve learned that the magic lies in balancing the individual “trees” with the overall forest effect.
The Art of Trunk Spacing: Avoiding the “Soldier Row” Syndrome
One of the biggest pitfalls in raft design
is creating a uniform, repetitive arrangement of upright trunks. Imagine a real forest – trees don’t grow in perfectly spaced, identical lines!
- Varying Distances: Allow for varied spacing between your upright
trunks. Some might be closer, suggesting a dense thicket, while others are further apart, creating open glades. This immediately makes the composition feel more organic and natural. - Height Variation: Just as in a real forest,
vary the heights of your upright trunks. Some should be taller, acting as dominant trees, while others are shorter, representing younger growth or understory. The first YouTube video on raft bonsai creation showcases this beautifully, presenting a finished composition with three taller trees
on one side and shorter ones on the other. This creates depth and visual interest. - Triangular Composition: Often, arranging the trunks in an uneven number and forming subtle triangular groupings can enhance the aesthetic
. This creates a sense of balance without being symmetrical. - The “Front” and “Back”: Even in a raft, consider a clear front. The front should be “more open,” “balanced,” and “intriguing,”
allowing the viewer to appreciate the base of the tree and the horizontal trunk’s character. Avoid having a thick, impenetrable wall of foliage at the front.
Crafting Convincing Foliage Pads: Each
a Miniature Canopy
Each upright branch, once wired into position, needs to be developed into its own distinct foliage pad, mimicking the canopy of an individual tree.
- Defined Pads: Aim for clearly defined, separate foliage pads for
each upright. Avoid allowing them to merge into one continuous mass, which can make the composition look heavy and unnatural. - Layering and Depth: Create layers within your foliage pads. Lower branches should extend slightly further out, with
upper branches receding, giving a sense of depth and volume. - Ramification: Encourage fine ramification (the development of many small twigs and branches) within each pad. This creates a dense, mature appearance, crucial for the “mini
ature forest” illusion. - Light Penetration: Remember Stefano Frisoni’s advice on needle cleaning for pines: allowing solar light to penetrate the internal parts of the plant prevents “emptying of the internal part.” This applies to all species – good light penetration ensures healthy inner growth and maintains dense foliage pads.
Balancing Perspectives: The Overall Impression
Ultimately, the goal is to create a harmonious composition that feels both natural and artistic.
- Naturalism: Strive for a “less artificial possible” look. The “cortex lived, the great quantity of the branches and the layout of the main trunks, are unique qualities of this exemplar,” as noted about a *
Pinus sylvestris* raft. This emphasizes the importance of allowing the tree’s natural character to shine through. - Flow and Movement: Consider how the eye travels across the composition. The
horizontal trunk should lead the eye, and the uprights should draw it upwards, creating a dynamic flow. - Negative Space: Don’t underestimate the power of empty space! Strategic gaps between trunks and foliage pads allow the viewer’
s eye to rest and appreciate the individual elements.
Designing a raft bonsai is an ongoing process of refinement. Step back frequently, view your tree from different angles, and let your artistic intuition guide you. It’s about creating a living sculpture that
tells a story, evokes emotion, and celebrates the enduring beauty of nature. For more on the visual aspects of bonsai, delve into our Bonsai Display and Aesthetics section.
🔄 Advanced Techniques: Converting Single Trunks into Rafts
So
, you’ve mastered the basics, and now you’re eyeing that single, perhaps slightly overgrown, tree in your collection, wondering if it could become something more. The answer, my friend, is a resounding YES! Converting an existing single-
trunk tree into a raft bonsai is one of the most rewarding advanced techniques in our arsenal at Bonsai Garden™. It’s about seeing potential where others might only see a challenge, and it truly embodies the spirit of transformation.
Peter Adams, a
renowned bonsai artist, perfectly encapsulates the core idea: “The raft method… is formed by laying a tree on its side and encouraging it to root along the recumbent trunk.” This isn’t just for raw
material; it’s a fantastic way to reimagine and revitalize an older tree.
The Art of the Layover: From Upright to Horizontal
The fundamental step is to take your upright tree and gently, yet decisively, lay it on
its side. This requires careful planning and execution.
- Strategic Branch Selection: Before you even think about laying it down, study your tree. Identify the strong, healthy branches that are already growing predominantly on one side. These
will become your new upright trunks. Branches on the opposite side (which will be the underside when laid horizontally) will likely need to be removed to allow the trunk to sit comfortably. - Root
Preparation: Unpot the tree and carefully prune its roots, aiming to create a flatter base that will allow the trunk to sit stably. Remember, you need to retain enough of the original root mass to sustain the tree while it develops new roots along its
horizontal body. - The Gentle Bend: For trees with flexible trunks, you might be able to simply bend the trunk into its new horizontal position. For stiffer trunks, you might need to make
relief cuts on the underside of the bend (never through the entire trunk!) or use heavy gauge wire and slow, gradual bending over time. - Anchoring the Trunk: Once the trunk is in its desired horizontal position, securely
anchor it in a training pot or box. Heavy gauge wire, stakes, or even strategically placed rocks can be used to prevent any movement.
Accelerating Root Development: The Power of Air Layering
One of the most effective advanced techniques for
converting a single trunk into a raft is air layering along the horizontal trunk. This technique, demonstrated in the first YouTube video, is a game-changer for encouraging new roots where you need them most.
- Why Air Layer?: Air layering allows you to stimulate root growth directly on the horizontal trunk. This is particularly useful for sections that might be slow to root when simply buried, or for creating a more robust and evenly distributed new
root system. - The Process:
-
Girdle or Incise: Choose a section of the horizontal trunk where you want new roots. Make a complete ring cut (girdle) around the bark, or
several vertical incisions, exposing the cambium layer. -
Apply Rooting Hormone: Dust or paint the exposed area with a strong rooting hormone (e.g., Clonex Rooting Gel or Hormex Rooting Powder).
-
Wrap with Sphagnum Moss: Pack moist sphagnum moss around the treated area, forming a ball.
-
Seal with Plastic: Wrap the moss ball tightly with plastic wrap (like Saran Wrap),
securing the ends to create a humid, sealed environment.
- Patience and Monitoring: Air layers typically take several months to root, depending on the species and conditions. The video creator emphasizes that roots should cover the base within six months.
Monitor the moss to ensure it stays moist. Once a strong root ball has formed, you can carefully sever the air-layered section from the parent trunk, effectively creating a new, rooted “trunk” for your raft
.
Grafting for Perfection: Filling the Gaps
Sometimes, a branch might be missing in a crucial spot, or you might want to introduce a particular type of foliage. This is where grafting comes in.
- Approach
Grafting: This involves bringing a small branch from another part of the tree (or another tree entirely) and grafting it onto the horizontal trunk where a new upright is desired. - Thread Grafting: A small branch can be threaded through a
hole drilled in the horizontal trunk, encouraging it to fuse and grow as a new upright.
Converting a single trunk into a raft is a testament to your skill and creativity. It’s a long-term project, but the satisfaction of seeing a new
forest emerge from a single tree is truly unparalleled. It’s a journey that teaches patience, observation, and a deeper understanding of your tree’s potential.
📚 Raft Bonsai Reading Material: Top Books and Resources for Mastery
The journey of bonsai is one of continuous learning, and when it comes to a specialized style like the raft, having
the right guides can make all the difference. While our team at Bonsai Garden™ shares our personal experiences, there’s a wealth of knowledge out there from seasoned masters and dedicated enthusiasts. We’ve poured over countless books and articles, and we
‘re thrilled to recommend some of our favorites to help you deepen your understanding of the captivating raft bonsai style.
Essential Books for Your Bonsai Library:
- “Bonsai with Japanese Maples” by Peter
Adams: This book is an absolute treasure, especially if you’re working with Japanese Maples (or even just want to understand the underlying principles of raft creation). Peter Adams is a highly respected authority, and his insights are invaluable.
- Why we love it: It contains a dedicated and comprehensive section titled “Creating Raft Trees“. What makes it truly stand out are the detailed drawings of the technique, which are incredibly clear
and “self-explanatory” for experienced artists, but also highly beneficial for those still learning. His conceptual drawings are legendary! - Content: While the cover features a Trident maple, the content remains highly
relevant for Japanese maples and the broader principles of raft design. - 👉 CHECK PRICE on:
- Bonsai with Japanese Maples by Peter Adams: Amazon.com/Bonsai-Japanese-Maples-Peter-Adams |
Stone Lantern Official Website
- General Bonsai Books with Style Sections: Many comprehensive
bonsai guides will have sections on various styles, including raft. Look for books by authors like John Naka, Harry Tomlinson, or Colin Lewis. While they might not delve as deeply into raft specifics as Peter Adams, they provide a strong
foundation in general bonsai principles that are applicable to all styles.
- Why we love them: These books build your foundational knowledge in pruning, wiring, repotting, and care, all of which are critical for successful raft bonsai.
Online Resources and Communities:
The digital age has brought a fantastic array of online resources, from detailed progression articles to vibrant community forums where you can ask questions and share your journey.
- Bonsai Bark: This blog often
features articles on various bonsai styles and techniques. Their article “Bonsai Rafting: Sinuous & Straight” provides an excellent overview of the style’s definition, variations, and key examples, including historical context. It’s a great starting point for understanding the nuances. - Bonsai Empire: Known for its high-quality articles and stunning progression series. Their “Pinus Sylvestris ‘Ikadabuki’ Raft Bons
ai Progression” is a must-read. It offers a detailed, step-by-step account of restyling a Scots Pine raft, highlighting techniques like needle cleaning and deadwood creation, and emphasizing the emotional
impact of the style. - Bonsai Nut Forums: Online communities like Bonsai Nut are invaluable. You can find discussions, ask specific questions, and see how other enthusiasts are tackling their raft projects
. While the specific “Raft style reading material” thread was inaccessible at the time of our research, the forums are generally a treasure trove of shared experience.
We encourage you to explore these resources. Each
offers a different perspective and depth of knowledge that will enrich your understanding and empower you on your raft bonsai adventure. Happy reading, and happy growing!
🛒 Where to Buy Raft Bonsai Supplies and Pre-Bonsai Stock
Alright, you’re inspired, you’re informed, and now you’re itching to get your hands
dirty and create your own raft bonsai! But where do you find the right tools, the perfect soil, and most importantly, that ideal piece of pre-bonsai material just begging to be transformed? Fear not, fellow gardener, because at
Bonsai Garden™, we’ve navigated the marketplace for decades, and we’re here to guide you to the best sources.
Finding Your Future Forest: Pre-Bonsai Stock
Finding the right tree to start your raft bonsai
is half the fun! You’re looking for a specimen with potential – good branching on one side, a flexible trunk, and a healthy root system.
-
Local Nurseries and Garden Centers: Don’t underestimate your local resources
! Many garden centers carry juniper, pine, maple, or cotoneaster varieties that can be excellent candidates for raft style. Look for plants that have been neglected a bit, perhaps growing horizontally in their pots, or those with strong lower branches. -
Specialized Bonsai Nurseries: These are your goldmines. Nurseries like Bonsai Mirai, International Bonsai (Bill Valavanis), or Willowbog Bonsai (where Stephen Dods sourced his Japanese Maple raft) often have dedicated sections for pre-bonsai material, sometimes even stock specifically suited for raft or forest styles. They can also offer expert advice on species selection.
-
Online Bons
ai Retailers: Many online stores, such as Bonsai Outlet, Dallas Bonsai, or Eastern Leaf, offer a wide selection of pre-bonsai trees that can be adapted for the raft style. Always check reviews
and ensure the seller has a good reputation for shipping healthy plants. -
Etsy and eBay: Believe it or not, these platforms can be great for finding unique or unusual pre-bonsai material, often from smaller, independent
growers. Just be sure to communicate with the seller and ask for clear photos. -
Bonsai Shows and Auctions: Attending local or national bonsai shows can be an incredible way to find high-quality material and connect with growers
. You might even stumble upon a tree already partially styled for a raft!
Gearing Up: Essential Supplies
Once you have your tree, you’ll need the right tools and materials to bring your vision to life.
-
B
onsai Wire: As we discussed, wire is your primary sculpting tool. We highly recommend Bonsai Aesthetics Wire, available in both aluminum and copper, and in convenient 1-kilogram rolls. -
👉 Shop Bonsai Wire on:
-
Bonsai Aesthetics Wire (Aluminum): Amazon.com/Bonsai-Aesthetics-Aluminum-Wire | Etsy.com/Bonsai-Aesthetics-Aluminum-Wire
-
Bonsai Aesthetics Wire (Copper): Amazon.com/Bonsai-Aesthetics-Copper-Wire | Etsy.com/Bonsai-Aesthetics-Copper-Wire
-
Bonsai Tools: For quality tools, look to brands like Kaneshin, Ryuga, or Masakuni. You can find these at specialized bonsai retailers
, both online and brick-and-mortar. Amazon also carries a range of good quality starter tool sets. -
👉 Shop Bonsai Tools on:
-
Kaneshin Bonsai Tools: Amazon.com/Kaneshin-Bonsai-Tools | The Bonsai Supply Official Website
-
Ryuga Bonsai Tools: Amazon.com/Ryuga-Bonsai-Tools | Ryuga Bonsai Tools Official Website
-
Bonsai Soil Components: For custom soil mixes,
you’ll need akadama, pumice, lava rock, and possibly horticultural grit. These can be found at specialized bonsai suppliers, some larger garden centers, or online. -
Rooting Hormone: Brands like Clonex Root
ing Gel or Hormex Rooting Powder are widely available at garden centers and online. -
Training Pots and Trays: Basic plastic training pots are essential for the initial stages. You can find these at most bonsai
retailers.
Remember, the best place to buy is often where you feel most comfortable and can get good advice. Don’t hesitate to ask questions, compare products, and build relationships with your suppliers. Happy shopping, and may your raft bonsai journey be
filled with discovery!