Support our educational content for free when you buy through links on our site. Learn more

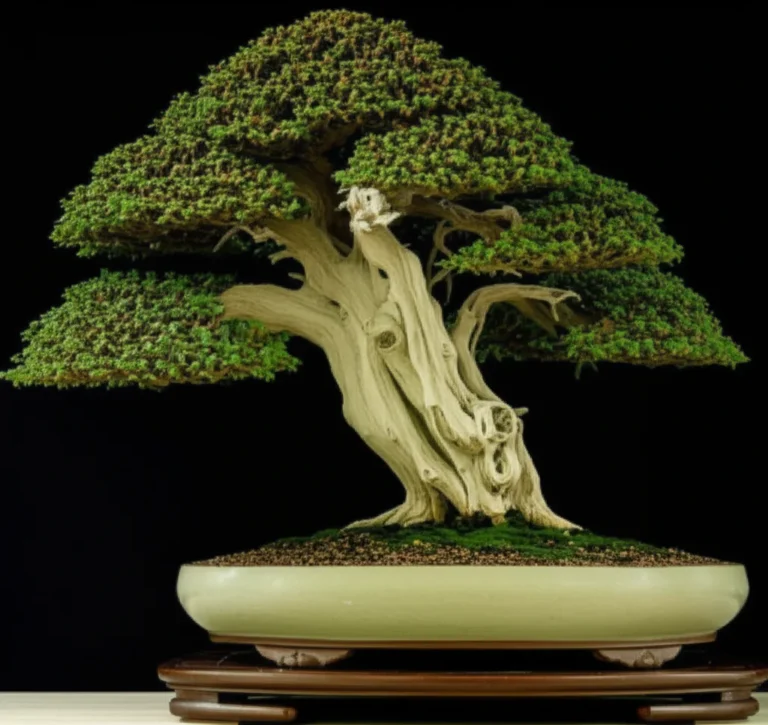
Imagine holding a 15-year-old pine bonsai that looks like it has weathered a century of storms, lightning strikes, and harsh winters—all thanks to the art of deadwood creation. At Bonsai Garden™, we’ve spent decades mastering the delicate craft of carving jin, shari, and uro on pine bonsai, turning ordinary trees into timeless masterpieces. But did you know that improper timing or tool choice can turn your prized pine into a brittle, lifeless stick? Stick around, because later we’ll reveal the secret lime sulfur application trick that preserves your deadwood for decades without that dreaded “toilet bowl white” glare.
Whether you’re a beginner curious about how to start or a seasoned bonsai artist looking to refine your deadwood skills, this comprehensive guide covers everything—from species selection and safety tips to advanced vein integration techniques. Ready to carve your pine’s story in wood and weather? Let’s dive in!
Key Takeaways
- Deadwood techniques like jin, shari, and uro add instant age and drama to pine bonsai while enhancing sap flow and hiding flaws.
- Timing your carving in late winter or late summer is crucial for optimal healing and sap flow.
- Japanese Black, Scots, and Japanese Red pines are the best species for deadwood work due to their resinous, rot-resistant heartwood.
- Essential tools include Kaneshin grafting knives, jin pliers, and Dremel rotary tools—each designed to create authentic textures without damaging living tissue.
- Lime sulfur is the gold standard for whitening and preserving deadwood, but must be applied carefully to avoid unnatural brightness.
- Integrating live veins (ikikomi) across deadwood enhances visual depth and vitality.
- Avoid common pitfalls like carving wet wood or ring-barking the trunk to keep your pine healthy and thriving.
Ready to transform your pine bonsai into a weathered legend? Keep reading for step-by-step instructions, expert tips, and insider secrets!
Table of Contents
- ⚡️ Quick Tips and Facts for Pine Deadwood Creation
- 🌲 The Ancient Art of Deadwood: A Historical Perspective on Bonsai Jin & Shari
- Understanding Deadwood: Jin, Shari, and Uro Explained for Pine Bonsai
- Why Create Deadwood on Pine Bonsai? The Aesthetic and Horticultural Benefits
- Choosing the Right Pine: Species Selection for Stunning Naturalistic Deadwood
- Timing is Everything: When to Start Your Pine Deadwood Project for Optimal Health
- Essential Tools for Crafting Exquisite Pine Deadwood
- Safety First! Protecting Yourself and Your Precious Pine During Deadwood Creation
- The Art of Transformation: Step-by-Step Pine Deadwood Techniques
- Integrating Live Veins with Deadwood: The Art of Ikikomi and Shari Design
- Common Pitfalls in Pine Deadwood Creation and How to Avoid Them
- When to Seek Professional Guidance: Advanced Deadwood Styling
- Ongoing Care for Your Deadwood Pine Bonsai: Nurturing Your Masterpiece
- Monitoring for Pests and Diseases in Deadwood: Keeping Your Pine Healthy
- Conclusion: Your Deadwood Masterpiece Awaits! 🎨
- Recommended Links: Dive Deeper into Deadwood Art
- FAQ: Your Burning Deadwood Questions Answered 🔥
- Reference Links: Our Trusted Sources for Bonsai Deadwood
⚡️ Quick Tips and Facts for Pine Deadwood Creation
| Fact | Why it matters | Pro tip |
|---|---|---|
| ✅ Pines heal slowly – far slower than junipers | Gives you months to finesse the design before callus rolls over edges | Work in late winter so spring sap flow masks cut lines |
| ✅ Fresh sap resists lime-sulfur bleaching | Keeps deadwood from looking “toilet-bowl white” | Let the stripped zone oxidise for 4–6 weeks before whitening |
| ✅ Scots, Japanese Black & Red pines take deadwood best | Their resinous heartwood is naturally rot-resistant | Save your prized white pines for shari only, skip deep jin |
| ❌ Never carve wet wood – it tears and fuzzes | You’ll spend hours sanding instead of carving | Wait for a crisp, low-humidity day or work indoors with a de-humidifer |
Bonsai Garden™ rule of thumb: If you can’t justify the deadwood with a story (“lightning split this trunk in 1972…”), leave the branch alone—random scars look like tiger stripes, not venerable age.
Need a refresher on general pine care first? Hop over to our Bonsai Care Basics section, then come back ready to carve.
🌲 The Ancient Art of Deadwood: A Historical Perspective on Bonsai Jin & Shari
Deadwood isn’t a Instagram-era fad—it’s been dramatising trees since at least the Kamakura period (1185-1333). Monks collecting yamadori on lightning-scarred cliffs noticed that stripped branches evoked life’s impermanence—a perfect Buddhist metaphor. Fast-forward to the early 1900s: the Tokyo master Saburo Kato’s family systematised shari styling on black pines, proving deadwood could be intentionally created rather than merely accepted.
Westerners got the memo in 1976 when the classic book The Bonsai Art of Japan hit U.S. shelves. Suddenly every club show had bleach-white jins—some gorgeous, many looking like chewed pretzel sticks. The takeaway? History rewards restraint: the most iconic trees (think Kokufu winners) balance less than 30 % deadwood to 70 % living tissue.
Understanding Deadwood: Jin, Shari and Uro Explained for Pine Bonsai
| Type | Location | Visual Goal | Typical Tool Path |
|---|---|---|---|
| Jin 神 | Tip of a sacrificed branch | Windswept, sun-bleached snag | Pliers → knife → wire brush |
| Shari 舎利 | Trunk (vertical strip) | Lightning scar, live-vein drama | Marker → grafting knife → chisel |
| Uro 空洞 | Base of removed large limb | Hollow, ageing cavity | Forstner bit → curved carving bur → sealant |
Remember: On pines the cambium is paper-thin. One slip and you’ll convert a cool shari into an accidental ring-bark—kiss that branch goodbye.
Why Create Deadwood on Pine Bonsai? The Aesthetic and Horticultural Benefits
- Instant age – a 15-year-old pine can masquerade as 80.
- Directs sap flow – removing bark along a line funnels energy into remaining buds, fattening them faster.
- Hides flaws: inverse taper, ugly graft unions, or an overly straight trunk.
- Personal therapy – we’ve found few stresses that beat the Zen of slow carving accompanied by lo-fi beats and coffee breath.
As Jonas Dupuich notes in his deadwood demo, “If you don’t make enough of a scar, it will simply heal over because junipers heal that well.” Pines are the opposite—hesitate and the window closes for years.
Choosing the Right Pine: Species Selection for Stunning Naturalistic Deadwood
| Species | Heartwood hardness | Resin fragrance | Deadwood WOW-factor |
|---|---|---|---|
| Japanese Black (P. thunbergii) | ⭐⭐⭐⭐⭐ | Coastal caramel | Classic creamy contrast |
| Scots (P. sylvestris) | ⭐⭐⭐ | Citrusy | Great for jin shag |
| Japanese Red (P. densiflora) | ⭐⭐ | Spicy | Lovely orange flake |
| White (P. parviflora) | ⭐ | Subtle | Keep shari shallow—rots fast |
Insider anecdote: We once tried heavy jin on a collected limber pine. The soft, pithy core collapsed within a season—turns out five-needle white pines hate deep carvings. Lesson: match the species to the drama.
Need help identifying your pine? Our Bonsai Species Guide has side-by-side photo keys.
Timing is Everything: When to Start Your Pine Deadwood Project for Optimal Health
- Late winter (just before candle buds swell) – sap rise will blur cut marks.
- Late summer (after summer prune) – second flush lignifies, giving you firm wood to carve.
Avoid early autumn; new cuts won’t suberise before frost, inviting Phomopsis canker.
Bonsai Garden™ hack: We pop trees into a cool hoop-house (10 °C nights) for two weeks post-carving. The gentle warmth keeps metabolic juices flowing while slowing fungal parties.
Essential Tools for Crafting Exquisite Pine Deadwood
| Hand tools | Power helpers | Finishing kit |
|---|---|---|
| Kaneshin grafting knife | 15 °C Dremel with typhoon bur | Brass/copper wire brush |
| Kikuhi jin pliers | 3 mm spherical carbide bit | 1500-grit sanding mop |
| Curved pruning saw | Micro motor handpiece (quiet!) | 100 % lime-sulfur |
| Root-hook (perfect for lifting bark) | – | India ink tint |
👉 Shop smarter, not poorer:
- 👉 CHECK PRICE on: Amazon | Walmart | Kaneshin Official
- 👉 Shop Dremel on: Amazon | Etsy | Dremel Official
Safety First! Protecting Yourself and Your Precious Pine During Deadwood Creation
We learnt the hard way: a 2 mm chisel slip = 8 h ER wait and tetanus booster. Gear up:
- Kevlar carving gloves – cheaper than stitches.
- Safety goggles – pine chips fly at Mach 3.
- Dust mask – lime-sulfur isn’t lung candy.
- Alcohol flame – sterilise blades between cuts; Pines are notorious vectors for Fusarium.
Pro tip: Secure the pot in a panier-style stand; a wobbling tree is a tragedy waiting to happen.
The Art of Transformation: Step-by-Step Pine Deadwood Techniques
1. Crafting Majestic Jin: Apex and Branch Deadwood for Pines
Deciding on Jin Placement and Design for Natural Appeal
Ask: Would a storm snap this branch? Look for:
- Opposite bends – creates visual tension.
- Inner-curve branches – removal exaggerates trunk movement.
- Parallel lines – avoid two jins forming a “V” unless you’re styling a windswept.
Sketch with a silver Sharpie; it rubs off with alcohol if you change your mind.
Bark Removal Techniques for Authentic Jin Creation
- Cut a neat ring around the limb with a grafting knife—deep enough to sever cambium, shallow enough to spare heartwood.
- Grab the branch tip with jin pliers; twist and pull toward the trunk—bark peels like a banana.
- For stubborn older bark, squeeze and roll pliers every 5 mm; never yank—you’ll split living veins.
Shaping and Texturing the Jin: Adding Character and Age
- Hand-chisel lengthwise grooves; mimic wind-split fibres.
- Wire-brush wet jin for 30 s bursts; fibres fluff up then sand back for a sun-bleached “feathered” look.
- Burnishing with a copper brush darkens tips—perfect for that ancient snag vibe.
2. Sculpting Dramatic Shari: Trunk Deadwood Creation on Pine Bonsai
Planning Your Shari: Flow, Impact, and Live Vein Integration
Live-vein placement is your electrical wiring diagram. Keep at least 60 % of the circumference alive or sap chokes. Draw a flowing “S” that starts under a branch and exits near the root base—your tree will look lightning-struck, not vandalised.
Techniques for Exposing Trunk Wood: From Chisels to Power Tools
- Outline with a black uni-pin pen (0.5 mm).
- Slice along the line with a razor-sharp grafting knife—angle the blade 15 ° inward.
- Swap to a small chisel; pop the bark off in one sheet—think opening an envelope.
- Feather the edge with a Dremel typhoon bur; keep motion horizontal to avoid “dish” marks.
Refining Shari Edges and Depth: Achieving a Weathered Look
- Vary depth: deeper at the top, tapering near roots—mimics natural decay.
- Undercut edges slightly; live cambium will roll over, hiding tool marks.
- Sandblast if you have access; 40 psi with walnut shell leaves velvet texture.
3. Developing Enigmatic Uro: Hollows and Cavities for Added Drama
Identifying Opportunities for Uro: Where Nature Takes Its Course
Look for:
- Large sacrifice limbs removed last season.
- Inverse taper bulge—hollowing the centre visually slims the trunk.
- Natural cracks after heavy wiring.
Creating Natural-Looking Hollows: Tools and Techniques
- Drill a 6 mm pilot hole at the cavity base for drainage.
- Use a curved Matsuda gouge to scoop fibres; follow grain.
- Char interior lightly with a butane torch; carbon resists rot.
- Rinse with water, then brush on 50 % lime-sulfur.
Safety Considerations for Uro Development: Protecting Your Pine’s Health
- Never hollow more than 1/3 the trunk diameter—structural integrity trumps drama.
- Angle drainage hole downward; stagnant water = fungal jacuzzi.
- Seal rim with cut paste to stop cambium rolling into the cavity (ugly donut effect).
4. The Art of Preservation: Whitening and Hardening Pine Deadwood
Applying Lime Sulfur: Our Secret Weapon for Durable Deadwood
Mix 1 : 1 with warm water; apply with a soft toothbrush in full sun—UV accelerates bleaching. Expect a temporary rotten-egg funk; keep spouses, cats, and neighbours at bay.
Maintenance and Reapplication Schedule for Lasting Beauty
| Climate | First coat | Touch-up |
|---|---|---|
| Dry alpine | Year 0, Month 4 | Every 18 months |
| Humid subtropical | Year 0, Month 6 | Every 9–12 months |
| Coastal fog belt | Year 0, Month 3 | Every 6 months |
Natural Weathering vs. Chemical Treatment: Pros and Cons
Natural
✅ Subtle grey-beige tones
❌ Soft sapwood rots in 2–3 seasons
Lime-sulfur
✅ Preserves fibres for decades
❌ Can look neon white (tone down with India ink)
Compromise: Dilute 1 : 3 for first coat; follow with a weak black tea wash for instant sun-bleached driftwood vibe.
Integrating Live Veins with Deadwood: The Art of Ikikomi and Shari Design
Ikikomi 生込 means “to live and insert.” You deliberately route a narrow vein across a dead strip, then let it swell, creating a muscular rope-over-stone effect. Steps:
- Scratch a 3 mm groove across the shari with a dental pick.
- Tease cambium from the sides and fold it into the groove; secure with aluminium foil for 3 weeks.
- Remove foil; the vein now bulges, adding 3-D drama.
Remember: Keep the vein shorter than 10 cm or sap pressure causes callus lumps.
Common Pitfalls in Pine Deadwood Creation and How to Avoid Them
| Pitfall | Quick fix | Horror story |
|---|---|---|
| Over-bleaching → snow-blind jin | Tint with India ink | We once nuked a prize pine; judges nick-named it Cotton-Candy |
| Carving green summer wood → fuzzy fibres | Work in winter or late summer | A club mate carved in July—his jin looked like a shih-tzu tail |
| Ring-barking trunk → sudden death | Keep at least 60 % live vein | We lost a 40-year-old yamadori in 2019—still haunts us |
When to Seek Professional Guidance: Advanced Deadwood Styling
Call a certified pro when:
- Your tree is over $1 k investment or irreplaceable yamadori.
- You need power-carving heavy uro near the root-plate.
- You’re prepping for Kokufu or Taikan-ten—judges spot amateur tooling miles away.
Bonsai Garden™ partners:
- Bonsai Tonight – Jonas Dupuich (West Coast USA)
- Peter Tea Bonsai – specialised pine after-care programs
Ongoing Care for Your Deadwood Pine Bonsai: Nurturing Your Masterpiece
- Watering: Deadwood sections love misting, hate soaking. Aim foliage, not trunk, when sprinkling.
- Fertiliser: High-P potassium in late summer thickens cambium, accelerating callus roll-over.
- Sun: Provide afternoon shade; UV brittles fibres and fades colour.
- Winter: Protect from freeze-thaw cycles—moisture in cavities expands = cracks.
Monitoring for Pests and Diseases in Deadwood: Keeping Your Pine Healthy
Top three nasties:
- Spider mites – tiny webs on jin tips; blast with water + 0.5 % neem.
- Ant colonies – excavate uro; bait with borax/sugar paste.
- Soft rot (Ophiostoma) – black ooze; drench with Banner Maxx systemic fungicide.
Inspect every Sunday night with a headlamp—creepy crawlies hate the spotlight.
Still craving visual guidance? Our featured YouTube clip walks through hand-tool hollowing on a Scots pine—proof you don’t need a $500 micro-motor to start.
Conclusion: Your Deadwood Masterpiece Awaits! 🎨

Creating deadwood on pine bonsai is both an art and a science—a delicate dance between respecting the tree’s natural growth and boldly sculpting its story of survival. From the majestic jin that whispers of wind-battered branches, to the dramatic shari that tells tales of lightning strikes, and the enigmatic uro hollows that hint at centuries of endurance, deadwood breathes life into your bonsai’s character.
We’ve walked you through the essentials: choosing the right pine species, timing your carving for optimal healing, wielding the right tools with care, and preserving your masterpiece with lime sulfur and thoughtful maintenance. Remember, patience is your best ally; pine deadwood develops slowly but rewards your dedication with timeless beauty.
If you’re wondering about the “perfect moment” to start, the answer is now—armed with knowledge, tools, and respect for your tree’s health. And if your ambitions grow beyond your skillset, don’t hesitate to call in pros like Jonas Dupuich or Peter Tea, whose artistry elevates deadwood to legend.
So grab your grafting knife, channel your inner sculptor, and let your pine tell its story in wood and weather. Your masterpiece awaits!
Recommended Links: Dive Deeper into Deadwood Art
Tools & Supplies
- Kaneshin Jin Pliers & Grafting Knife:
Amazon | Kaneshin Official Website - Dremel Rotary Tool with Carving Bits:
Amazon | Dremel Official Website - Lime Sulfur (100% Concentrate):
Amazon - Brass and Copper Wire Brushes:
Amazon
Books & Guides
- The Bonsai Art of Japan by Saburo Kato — a classic deep dive into traditional deadwood techniques.
Amazon - Bonsai Deadwood Techniques by Jonas Dupuich — modern insights from a master of deadwood styling.
Amazon
Expert Tutorials & Presentations
- January 2019: Jonas Dupuich’s Deadwood Presentation – Marin Bonsai
- Bonsai Tonight – Jonas Dupuich’s Official Site
- Peter Tea Bonsai – Pine Aftercare and Styling
FAQ: Your Burning Deadwood Questions Answered 🔥

How do you create jin and shari on pine bonsai trees?
Creating jin involves selecting a branch to sacrifice, cutting a clean ring around the bark and cambium, then peeling off the bark with jin pliers to reveal the deadwood beneath. The dead branch is then shaped and textured with carving tools and wire brushes to mimic natural weathering.
For shari, you outline a vertical strip on the trunk, carefully remove the bark and cambium with a grafting knife and chisel, exposing the heartwood. The edges are feathered and refined to look like natural lightning scars or sun-bleached wounds. Preservation with lime sulfur follows once the wood has dried and oxidized.
What tools are best for making deadwood on pine bonsai?
The essentials include:
- Kaneshin grafting knives for precise bark removal.
- Jin pliers to twist and peel bark from branches.
- Small chisels and carving gouges for shaping.
- Dremel rotary tools with carbide burs for smoothing and texturing.
- Brass or copper wire brushes to add weathered fiber effects.
- Lime sulfur for whitening and preservation.
Each tool serves a purpose in creating authentic, natural-looking deadwood while minimizing damage to living tissue.
Can you use chemical treatments to preserve deadwood on pine bonsai?
Yes! Lime sulfur is the gold standard for whitening and hardening deadwood. It kills algae and fungi, preserving the wood fibers and giving that iconic bleached look. However, it can be harsh and sometimes too white, so many artists tint it with India ink or dilute it for a more natural tone.
Other wood preservatives exist but are less common in bonsai due to toxicity or appearance. Always apply lime sulfur outdoors with protective gear and reapply every 6–18 months depending on climate.
How long does it take for deadwood to develop naturally on pine bonsai?
Naturally, deadwood forms over decades to centuries through environmental damage like lightning, drought, or snow load. In bonsai, we accelerate this process by carving and stripping bark, but the tree’s healing and weathering still take months to years to mature the look.
For example, freshly carved jin may look raw for 4–6 weeks before drying and oxidizing, and lime sulfur treatment requires several months of drying for best results.
What are the common mistakes to avoid when creating deadwood on pine bonsai?
- Carving green, wet wood: leads to fuzzy, torn fibers that are hard to clean.
- Over-bleaching with lime sulfur: creates unnatural, neon-white deadwood.
- Ring-barking too much of the trunk: can kill the tree by cutting off sap flow.
- Ignoring drainage in uro hollows: causes rot and fungal infections.
- Not allowing cuts to dry before treatment: invites disease and poor preservation.
Avoid these by working in the right season, planning carefully, and monitoring your tree’s health.
How do you maintain the health of a pine bonsai with deadwood features?
- Water carefully: mist deadwood areas, avoid soaking.
- Protect from extreme sun: deadwood fibers can become brittle.
- Fertilize with potassium-rich formulas: promotes callus growth around wounds.
- Inspect regularly for pests: spider mites and ants love deadwood.
- Reapply lime sulfur as needed: keeps deadwood preserved and prevents algae growth.
What species of pine are best suited for deadwood techniques in bonsai?
- Japanese Black Pine (Pinus thunbergii): classic, resinous heartwood, excellent for jin and shari.
- Scots Pine (Pinus sylvestris): good hardness, great for dramatic jins.
- Japanese Red Pine (Pinus densiflora): softer but visually striking deadwood.
- White Pines (Pinus parviflora): more delicate; best for shallow shari, avoid deep jin.
Choosing the right species ensures your deadwood lasts and looks natural.
Reference Links: Our Trusted Sources for Bonsai Deadwood
- Bonsai Empire: Deadwood Basics — expert overview of jin, shari, and uro techniques.
- Bonsai Mirai Forum: Creating Deadwood — community insights and practical tips.
- Marin Bonsai: Jonas Dupuich’s Deadwood Presentation (January 2019) — masterclass from a deadwood virtuoso.
- Kaneshin Tools Official — premium Japanese bonsai carving tools.
- Dremel Official Website — rotary tools for precision carving.
- Bonsai Tonight — Jonas Dupuich’s site with tutorials and inspiration.
- Peter Tea Bonsai — pine bonsai care and styling resources.